19 December 2006

Now for something completely different

It has been all too exciting this Fall/Winter. The Northwest had a terrible windstorm 14 Dec. Neighbors around us have trees on the rooftops. Fortunately for us (although is did not seem so fortunate at the time), we had a 140-foot Douglas Fir drop a 20+ foot branch (spear) right into the master bedroom on Monday night, awaking us with a thud:

Inside View of the branch that landed in the master bedroom Monday night:

Rude Awakaning


Outside view of said branch:

Outside view


As a result, I got right on it and had three very large trees that were on the other side of our backyard dropped before the major windstorm of the decade hit (the workers were working their chainsaw magic right until the storm would not let them work any longer.)

Here is a photo of the trees that were removed (taken the day after the storm). You see a portion of the 140-foot Doug fir down:

140' Doug Fir DOWN


Of the three that were removed, the 100' Cedar (pictured below) was actually rotten and would have most likely deposited itself on our house had is not been removed. That's our fence on the left of the felled trees.

Hollow Cedar tree, it was over 100 feet tall!


So dear knitter, we were without power for 4 days. When the roads were finally clear, and I could get out,  the FIRST place I went to was....my local YARN SHOP, of course.

I'll be sharing what comes from that soon.

10 December 2006

Fall 06 Knitting

We had a spell of really cold weather (and no power to boot for over a day). Knitting seemed the smartest thing to do to keep warm. Here are some recently finished projects:
(note: as fast as I am, I did not do all the following projects in those 33 hours without power.)

Picture of my knitting motivation (or, why we were without power) - shot from my backyard in the Pacific Northwest:


Knitted Wrap
This is simplest of wraps to knit. Simply choose two or more of your favorite yarns. Buy the same length of each. Cast on (VERY LOOSELY) a lot of stitches (I cast on 170, size 10.5 needles). Leaving a long tail (12+ inches), knit one row, break the yarn leaving a long tail on the other end (12+ inches). Next row: knit with yarn #2, leaving a long tail (12+ inches), knit with the second yarn to the end, break the yarn leaving a long tail on the other end (12+ inches). I assume you are getting the rhythm here.  You will knit the wrap lengthwise, creating a self fringe-as-you-go. Every sixth row, tie off the fringe. The whole wrap is the knit stitch, alternate your yarns with each row. You are done when you are out of yarn. Trim the fringe to an even length. Oh, cast off REALLY loosely.

What I like: this is light as air, is knit with amazing yarn, and the two yarns together look totally different than individually.
What I don't like: I ran out of yarn before it was as wide as I would like it to have been. So it ended up more like a  Warf (wrap/scarf). Can you find the errant row? As I was knitting in low light (remember, no power) I knit one row from the wrong end, making a row of stockinette instead of garter. I didn't see the row until I had bound off. Damn, damn, damn.
Yarn used: A fab mohair, of which I cannot find the label and 250g of Fleece Artist Hand Dyed kid/silk 2 ply. (This link shows you the type of yarn, but it looks like the orange/yellow colorway is no longer available.) The fleece artist skein was a double skein, and cost $42. USD. The mohair was expensive too, thus due to budget, this was as wide as it was gonna be.
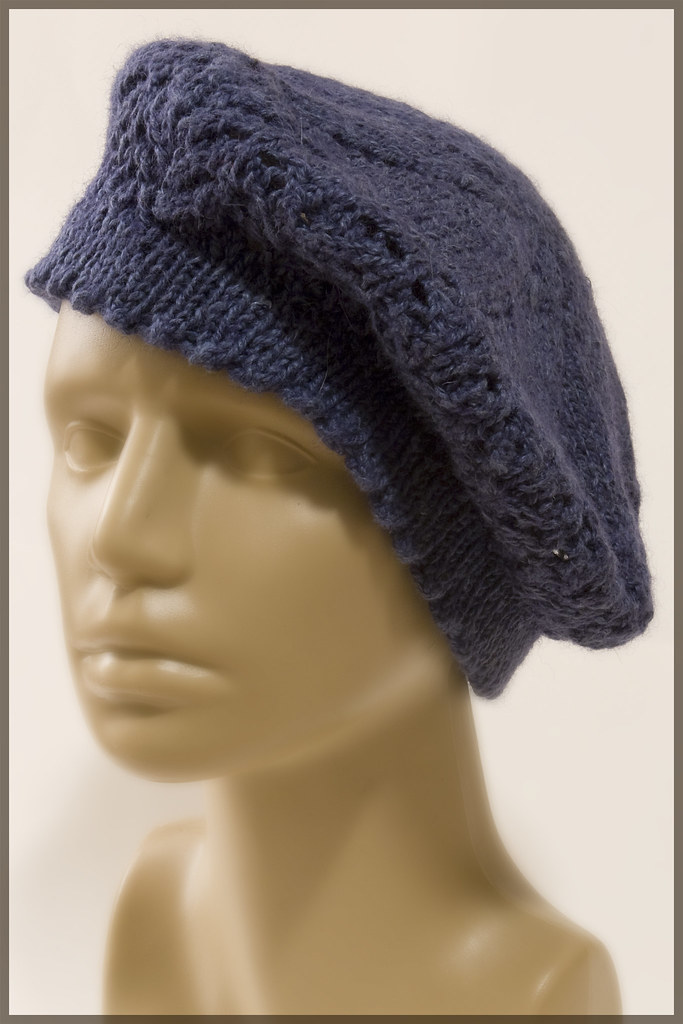
Narrow wrap - Garter Stitch Shawl - Silk, Wool, and Mohair

kid/silk/mohair wrap closeup


Hats and Scarves
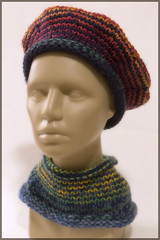
After mixing it up with the kid/mohair wrap, I thought it would be fun to mix and match some of the novelty yarn I have in the stash. (Remember when we all purchased a ton of that stuff, thinking it would make cool scarves? Then we decided that natural fibers were better, and are consequently stuck with a stash of fake fiber.) The following was my attempt to reduce my fake fiber stash:

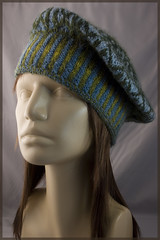
Pillbox hat: 1 strand novelty bobble yarn (microfiber) + 1 strand Lion Suede + 1 strand of a microfiber yarn, dk weight. Knit from the top down in the round on two circulars about size 11 needles, using the "don't swatch" method, knit in stockinette stitch with a few rounds of purl rounds for contrast. Cast off with i-cord finish (won't do that again, it pulls in.)
Scarf: 1 strand novelty fuzzy yarn "Blush" + 1 strand elann peruvian wool, sport weight. Stitch is 1 row knit, the next row, *YO, K2tog* +  a couple of edge stitches.
Final verdict: The hat is too bright for me, and the novelty yarn is just too novel. The scarf is a keeper.

pillbox hat and scarf

close up


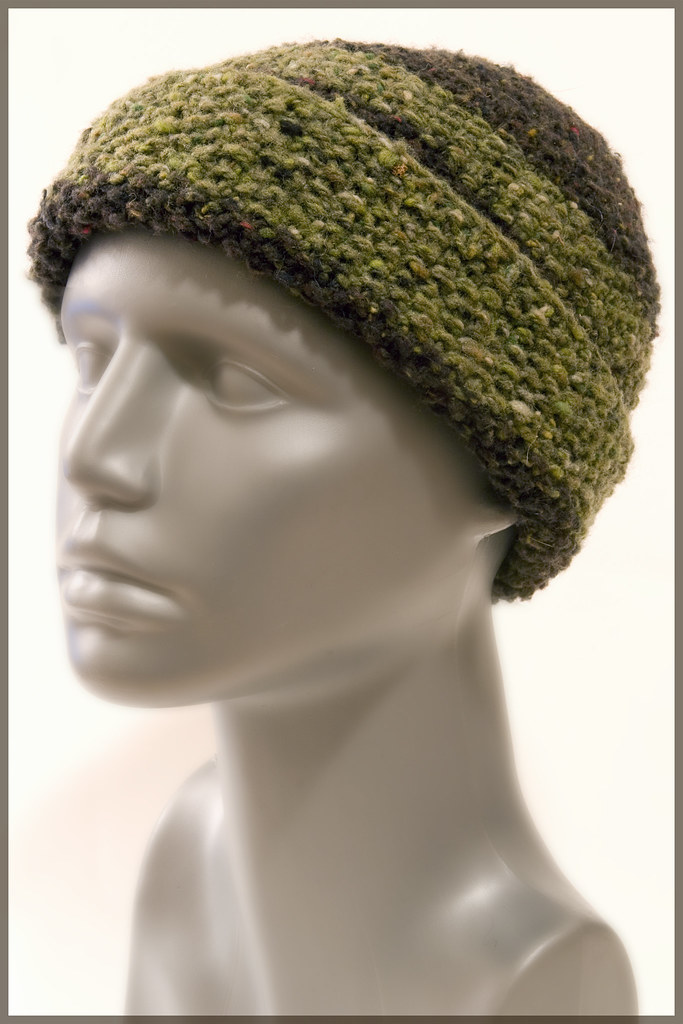
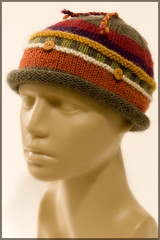
Next hat and scarf combo

Pillbox hat: (my fave style) is also knit using the "don't swatch" method, knit-in-the-round-on-big-needles. Stockinette with bands of purl. Washed in hot water to fluff out the mohair in the novelty yarn.  Two strands: 1 strand is Lion suede, the other is "Verve" by Sierra Pacific Crafts, Verve has a little mohair and wool in it (one of those skeins you see in the sale bin at Ben Franklin crafts store and think, "Hey, although it's mostly acrylic, I think I can do something with this....) I cast off with larger needles than I knit with to avoid the "pull-in" I got with the previous hat.
Scarf: Another one-skein project using a fuzzy acrylic + mohair yarn, cast on about 15 stitches, big needles, garter stitch till you run out of yarn.
Verdict: Both are keepers!

pillbox hat using lion suede and verve


Fingerless Mitts
Pattern by Ann Budd (As Ann tends to do, she has created this pattern in a grid for multiple guages - which makes it a bit harder to follow)
Found in "Weekend Knitting" by Melanie Falick (pages 96 - 100).
Yarn: Patons SWS (soy wool stripes), Natural Denim,  about 1 skein
I knit these up to see if they would be a good pattern for a brand new knitter. As they are all garter stitch, knit flat (vs. in the round). Also wanted to try Paton's new soybean-based yarn.
Verdict: Nice wristlets, but not for the beginner as you need to knit short rows to increase width for the palm and the pattern is complex to read. The soy yarn is very slippery too, and fatigued my hands. I would not want to knit a whole sweater out of it.


Fingerless Mitts by Ann Budd, made with Patons SWS soy yarn


And lastly, a quick project for gifting:

Soap Sack - used to house a handmade bar of soap. Purpose: serve as a washcloth and soap holder at the same time.
Cast on 30 stitches, yarn: hemp for knitting "allhemp6",  size 5 US needles (two circulars, this was knit in the round). Did a row of YO, K2tog to accomodate braid for the closure, then  a  pattern I wanted to try out. Got bored tracking the pattern because it required that I convert it on-the-fly for knitting in the round and had 20 rows for the pattern, so I wrapped it up with a few rows of purling in the round for texture. Completed with a three-needle bind-off.  Pictured with the handmade soap in it.

soap sack


12 November 2006

Who are you?


Just who is PULSH?

I'm Charisa Martin Cairn. Originally a Texan, I can now be called a native Pacific Northwesterner -- I've been here over 30 years. I love all things fiber, live in the NW with my partner the amazing artist, Carol. Have three full grown kids (two above, I'm on the left.) And, I am a lucky, lucky duck.

31 October 2006

Hallowigs!

Dreamy Hallowigs (using Red Heart yarn, of course)


Silly Hallowigs

06 October 2006

Clever Austrians!

Austrian sock wool (Fortissima Colori, #9076), engineered to look like you did a lot of work, when in fact, you only used one skein of wool (per sock!) Knit from the toe up - starting with Judy Brecker's perfect cast on that needs no adjusting.. This is the ONLY way I'm knitting socks from now on. Knitting from the toe means they always fit! I used this basic "How to" by Judy Gibson and Peggy Pignato -- ignoring the cast on instructions, because I used Brecker's perfect start...but other than that, I followed "Gibson/Pignato's instructions -- making adjustments to knit on two circular needles instead of 4 double points...but that is my preference.

20 September 2006

Lifestyle Top Down Hats, No Swatch Needed

Wherein I provide you with a guided tour to taking your knitting into your own hands and knitting hats that always fit.

Click to download the PDF version of this article.

Not a pattern, but a lifestyle
Inspired by Susan Pierce Lawrence’s
Live Dangerously, Don't Swatch[i] method of hat-making. Building on Susan’s theme and some basic rules, you can create any type of hat you can think up.


Let me walk you through the Manos Beret (photo, above):

1.       Cast on 8 stitches using Emily Ocker's cast on. You will be knitting in the round with two circular needles. The sample is knit with Manos del Uruguay wool.

2.       Increase 8 stitches every other row until the circle is slightly bigger than the top of the head you are knitting for, by about 3-4". (Place markers at the increases,  use the type of increase desired: K2 in one stitch, YO, etc)

3.       Continue knitting, no increases for about 2-2.5".

4.       Next row: decrease by 10% by *K 8, K2tog* all the way around. Note, if you knit a bigger circle, say, one that is 4" bigger than the head, you might need to perform more decreases than just 10%. The goal of this decrease row is to make the opening about your head size – try on as you go.

5.       The band was knit in K1P1 ribbing until it was double the length you want.

6.       Cast off loosely, then fold the band in half and sew to inside of hat. 


 Using this no-swatch, top-down method, you can knit any hat, any size, any stitch pattern. Play!
Want it floppy, knit it big! Want a skull cap? Knit is 5-10% smaller than the head it is intended for. The possibilities are almost infinite. Hats take from 100-250 yards of yarn (bulky yarn requires less yardage than fine yarn.) The type of hat you end up with can be decided based on the yarn, the head you are knitting it for or both. Use the needle size that is appropriate for the yarn you have chosen.

For a beanie, start with 8 stitches, increase every other row, and stop increasing when your circle is about 5-10% less than the measurement of the head. Then knit in pattern and/or ribbing until the hat fits. Loosely cast off.

For a pillbox, start with 8 stitches, increase every other row, and stop increasing when your circle is the measurement of the head. Knit in your chosen pattern until the hat fits (is the right length). Add a turn back brim if desired in another pattern or just extend the length in pattern, loosely cast off and fold back.

For a beret, start with 8 stitches, increase every other row, and stop increasing when your circle is the same size as a large plate (bigger than your head measurement). Knit without decreasing for several inches (3-6 inches, more will make a billowy beret), then decrease as I mention in the Manos beret walk-through. Knit a ribbing (K1P1/ or K2/P2, or a garter band which, in the round is K1 row, P1 row), loosely cast off and fold back.

You will knit your hats with confidence because they will fit! Look around you and try on hats. Pull out your pocket measuring tape to jot down the dimensions. Replicate at home!


Hats I've made - as you can see, my head prefers the pillbox shape so there's more of 'em.
Click a photo below for big.

Noro and Brown Sheep (Soloid) Pill box, short brim, slightly felted / fulled Hemp Beret, lace pattern on the brim Beanie with seed stitch, Rowan Silk 
Destash hat, chenile and boucle yarns held together. Started with an oval shape rather than a circle because I did not have a crochet hook with me when I started (to cast on Emily Ocker's co) Learning to Navajo Ply yarn - so I can join the Red Hat Society Destash Pillbox 


[i] Susan Pierce Lawrence wrote up directions for how to knit a hat from the top down without a swatch. You can scroll to the bottom of the page in this link or you can purchase the directions here for$3 USD. I prefer her directions that were given online - because she talks about doing a slightly pointed top with a 6-stitch cast-on, or a flat top with an 8-stitch cast-on in her archived blog entry. The purchased pattern only refers to the 8 stitch cast on, and doesn't refer to the Ocker cast on, which is invaluable when creating a circle.

13 August 2006

Summer Knitting

I haven't been slacking on the knitting, just the posting. Recently completed:
Two Color Fair Isle Socks, Woman's size 9. Knit Pick's Simple Stripes Fair Isle Socks pattern and Lorna's Laces Shepherd Sock Yarn, Rainbow Colorway. The Knit Pick's pattern is deisgned specifically for their own self striping yarn, and the bands of fair isle patterning should be distinct. It turns out that Lorna's color repeats are much shorter, so the intended effect is lost. However, I got back to kntting two color with two hands, and the socks are fine, just different than I expected. The black is Paton Kroy sock yarn (black, although this shade is not shown on their web site). Knit on Clover double points bamboo, size 1.

Comments:  I knit the heel per the instructions with just the black wool and was very unhappy with the look. Short row heel just looked crappy. I elected to knit an afterthought heel in two colors to give the heel more durability. The afterthought heel is the only way to go with highly patterned socks. Now that I look at the socks, I would prefer the heel in black, and should have just done two strands of black (knit like a two stitch fair isle).


Close Up of the afterthought heel, and my favorite band in sock:

12 August 2006

The Orange Saga continues

Still working on this damn sweater. Rounding the bend, should be done soon. When I'm complete with this, I will have knit the whole thing about three times. The good news is that it fits Carol. Thank GAWD.


P.S. the sweater is Cascade 220 wool, color #2436

27 Dec update: The sweater is sewn and finished. I have the cannot-felt-side-loading-new-type of "no agitator" washing machine and decided to put it through a cycle to make the stitches consistent. Guess what. Cascade 220 felts in any type of washing machine. The damn thing felted. I blocked it to Kathmandu and back, and it will probably fit Carol ok, but I HATE this sweater.

28 July 2006

Kool Aid Yarn

After reading about kool aid for dyeing yarn on Knitty, I decided to give it a go. It is oh so simple.

The first batch was a rescue of some really ugly brown/blue varigated worsted wool. I bought it because I thought the blue brown would look earthy, but when I swatched it the result was something that should have been left in the '70s.

Now, I have some lovely chocolate cherry yarn, ready for a project:


Next, I dyed 2,640 yards of Knit Pick's Bare - 100% Merino Wool Lace Weight using Grape Kool Aid. The test sample I dyed was a very dark eggplant. Using the formula from the Knitty article, (1 packet per ounce of yarn) I thought my yardage would be a dark eggplant color. Instead, I got a light lavender that is spotty striated and will result in some interesting lace.


25 July 2006

Short and Sweet, sort of.

Thought that knitting in a cotton/rayon yarn would be prudent for Summer. This finished product has a nice drape and weight, but I won't do this again. Slubbed Rayon is hellish to deal with because it is so slippery. I re-knit lots of this broken rib scarf due to easily dropped stitches.


15 June 2006

Fiber Trends Clogs complete

Wool used: Elann Peruvian Collection Highland Wool, 3 strands -- pattern calls for 2 strands, but recommendations were 3 - for a total of 6 skeins
Pattern: Fiber Trends Felted Clogs
(I knitted the orange example in the pattern).
Felting time in washing machine, in zippered pillow case: 1 hour
Total cost: $14-15USD + time (several movies on a weekend)
Finish on bottom (not shown): leather cut to shape and glued on. (These slippers will make for massive slippage if you don't do something to prevent it.)

Pre felting:


Really really big before felting


Post Felting:
Completed with "bumper" row joining the two soles


Fiber Trends Clogs - Post Felting Completed with "bumper" row joining the two soles


Back of clogs (raised heel option)


Fiber Trend Clogs - Post-felting,  raised heel option for back of clog


What would I do different? The "bumper" section, an extra row or two added when the inner and outer soles are joined, is difficult to felt evenly. Next pair, I'll do a 3-needle bind off and knit a 3-4 stitch i-cord in the bind off to create a bumper. As it will be even all the way around, it is likely to felt more evenly.

15 August 2006 Update: When I made these clogs I glued leather soles to the bottom. I thought they were expensve (the leather cost $7.USD). Today I saw the Fiber Trends soles for $16.99 USD, and now I realize that purchasing a hunk of leather and cutting it to the size of the sole is very economical. And, slippage is prevented indeed!

21 May 2006

Habu Textiles - experiment

When in Portland a few weeks ago, I discovered, quite by accident, Knit/Purl

Knit/Purl in Portland Oregon, United States


It is such cool knitting store. If you are ever in the area, or online, check them out.

While there, I purchased some yarn from a Japanese textile factory. I had hoped to find some of the Habu textiles yarn while visiting Japan - but as life would have it, I found it in Portland!

Darcy Cameron, owner of Knit/Purl, recommended I purchase the [Habu item # A-33, 2/48 merino wool cone, color 40, 100% wool, 2241 yards in 3 oz] and [Habu item # A-21, 1/20 silk stainless B yarn (thread really), color 4, 69% silk, 31% stainless, 281 yards in .5 oz] - knit them on a US #10 needle, then felt it for an interesting light felted material. She said that the silk-wrapped stainless steel thead provides body to the yarn, and holds it shape when pressed. Indeed, it does.

When knitting a swatch, I went with Darcy's recommendation and used a US size 10 needle. I knit in garter stitch pattern (knit every row), randomly adding cast off of 2, 3, and 4 stitches with a cast on of 2,3, and 4 stitches on the next row. The penny is to show you how tiny the thread is...it's hard to see when knitting!

Habu textiles thead, knitted prior to felting


I felted the swatch by hand, and it felted almost instantly. I lost just a little width, but probably more than 1/2 the height. I love the "cobweb" effect. The hand is wonderful. The following is a closeup. The result is really a fine look, with cool organic edges.


Habu textiles swatch after felting


This is destined to become the cobweb wrap. Now, to designing it! 

(note: color is not accurate. The yarn is a mossy/grey/green and the silk/steel is a grey color.)


08 May 2006

Starting a new knitting group in my town - wanna join?

Although I'm in a remote area of Washington, I'm going to try and find like-minded knitters in the Monroe/Snohomish/Sultan area. If you are interested in a knitting group of folks who really want to improve their craft and share their knowledge with each other, come give us a try. Read about the new Bitch and Bitch Knitting group in Monroe.

08 April 2006

Life is always better at your local yarn store, even if it's not local

Today I was able to break away from the insanity of work and have a few moments to myself to learn about Tokyo. And of course, what would be in my search but a local yarn shop. Initially, the Internet offered up a large craft mega-store -- something I presume on the order of a "Michael's" that the states has to offer. Instead, I opted for the dark-horse option and chose the small yarn shop that showed up in my MSN web search.

And, how delightful the find! See "Mother Earth BIS" , the natural-dyeing and gallery cafe run by Naomi Tokuni in Tokyo. Elegant yarn, amazing hand work with sport-weight yarn and small needles, wonderful colors. I don't know if I'll ever knit over a size 4 needle again. Naomi's projects are so beautiful and inspiring. The good news/bad news is that Naomi takes only cash, so I was limited to spending the 5000 yen I had on me.


Naomi Tokuni's "Mother Earth BIS" Natural-dyeing shop and gallery in Tokyo, Japan


See more of Naomi and her shop here.

07 April 2006

Knitting Re-do, or .25 change in stitch gauge really does matter

Spent 10 hours knitting on the plane on the way to Tokyo. Got here and realized that the sweater I was knitting was going to be 5" too big. On me, great, on the sweater's recipient, not. So, rip-it, rip-it -- and I start all over again.


Frogged sweater


20 May 2006 - Carol's orange sweater update:

As of last night I completed the sweater front and back, almost ready to join the shoulder seams. Carol had requested a "plain orange sweater".  To avoid going crazy, I added a seed stitch border that took place just above the underarms. Last night when I had her try it on, she said, "I don't like the border." Damn. Rip, rip, rip. It is now back to a tube awaiting the separation between front and back. But, this project has been a continuous un-do/re-do/un-do/re-do project. I need to set it aside and wait for cooler weather.

Moral of the story: if the recipient of the gift wants it plain, just buy a plain sweater at LL Bean and have them gift wrap it.

04 April 2006

Tokyo is just, well, grey today.

I'm spending the week in Tokyo on business. And you know, I am just not that wild about this place. Granted, so far, all I've seen is city and more city. And, rain and more rain. There is something very sobering, as a manager of localization, walking around in a city with really, poorly translated signage. English is hip, as far as I can tell, but the combo of words used for naming just leaves me with a big fat question mark in my head. For instance, I just went to a monstrosity of a shopping mall (14 stories) and the sign outside the door is "Creative Life, Toku Hands". Now, that sorta makes you think of, umm, something made by hand, creativity, etc... Inside, it was a Tokyo-Target with widgets and gidgets that are flashy and overpriced. I am humbled as I walk around and hour after hour and do not hear one word of a language I know. And, anything I say is not understood. All Americans should have this experience at least 10 times in their life. It might create a tsunami of understanding and patience in the culture.

I have all day Saturday to myself, and maybe I'll feel something different by then. At least, maybe I'll find a little Japanese yarn!

The good news is the cherry blossoms are in full flower. Here is a photo shot early this morning (in the grey rain) from my hotel:


Tokyo Cherry Blossoms!

18 March 2006

Winter Knitting - pictures finally

Show and Tell for Winter - details and links to patterns in the near future.

Infinite Shawl - knit in one continuous loop, it has one side.
Anny Blatt wool purchased in Paris in the color that is all the rage.
Infinite Shawl
10 Dec 2006 Update 
Well, It's not wide enough for a shawl, and I've decided I'm just not a fringey type) at least not for this item. So today I removed all the fringe and it is now a SCARF that does a double wrap around the neck. Much better.


Most Expensive Scarf I ever knit
(because I bought 1 skein each of the colors needed to make the fringe)
Too bad it's so warm I need to live on a polar cap to make use of it.
Most expensive Scarf I ever knit

Socketta Gloves, finally done
Socketta Gloves Finally Done


Love This Hat! My Favorite: Personal Touch Pattern from Fiber Trends. Paton Yarn, double strand.
It's very thick and perfect for very cold weather.
Personal Touch Felted Hat - Double Strand of Paton's Wool


Lastly, a Rowan Silk Yarn in a simple rolled Beanie
(That's August staring at you!)
Rowan Silk in a simple rolled edge beanie


05 March 2006

Chunky Newsboy Cap

Found a chunky Newsboy cap that satisfies the younger set. This is a pattern from the Hilltop Yarn store in Seattle, WA. Super bulky acrylic/wool yarn on size 17 needles.


Green Newsboy Cap

22 January 2006

January Blues

Never in my wildest dreams did I ever imagine I would knit something, and then shrink the hell out of it. But here I am, doing just that. Finishing up on holiday promises, I delivered the final two hats today. (Modeled here by Michelle.)


Hat 1:  Fibertrends (first pattern AC-1), ; two stands of Paton Classic Merino Wool (peacock and navy); blocked on Round Crown slant Hat Shapers form. Added a simple garter band in purple wool (felted, post-kntting)


Hat #2: Cloche design cobbled together from lots of patterns, but basically a huge bucket until you felt it. Knit with  Kraemer yarns, "Mauch Chunky; blocked on Bowler Hat Shaper's form. I used a 3 stitch I-cord band (then felted it) to finish it off.


14 January 2006

Diamond Head Hat

For gift-giving this recent holiday season I offered to make each of my family a hat of their choosing. My first daughter selected a style I a) had to learn and b) was of a method that took *forever*. It is done. Noro Kureyon varigated yarn (colorway #128, now discontinued) does wonders with this design. It originally started out as the "Diamond Head" pattern in the book, "Hats - a Knitter's dozen". Said daughter asked for the ever-so-popular built-in bill, so with some time spent in trial-and-error, I finally was able to produce her order for her head topper.


How to make the visor? Make the hat 3" longer than needed, fold to make a hem. Cut a bill-shaped piece of plastic and insert at front of hat. Pull the wool a bit to shape it and tack around the bill. Stitches don't show and the bill is integrated into the design.


P.S. Only offer to make this hat for someone you really REALLY love, or you'll be cursing the whole time you are weaving in those thousands of ends.

About Me

My photo
I'm Charisa on Ravelry.

Blog Archive

Follow PULSH on Facebook

P U L S H © 2008. Template by Dicas Blogger.

TOPO