Welt, Ridge, Pintuck: How To
A knitted welt adds texture and definition to your knitting. You can do it small, you can do it large. It's easy. Here's how to do it. Click a photo to see it bigger.
[download the Wedge Hat pattern, and get this tutorial in the pattern.]
1. Decide what your texture will be: garter ridge, stockinette, etc.The edge ridge in the Wedge hat is garter stitch.
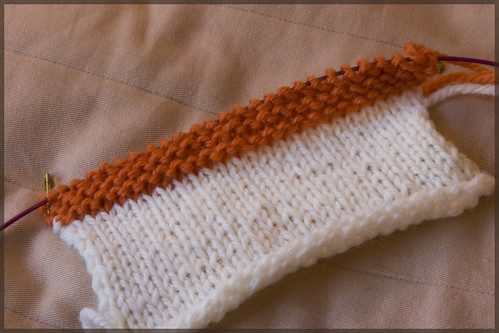
2. Knit 4 or more rows in your desired ridge pattern. Make the last row of the ridge pattern a wrong side row.
Example here is knit in garter stitch. This technique is very easy if you make the ridge a contrasting color.
photo (a): knit the ridge fabric
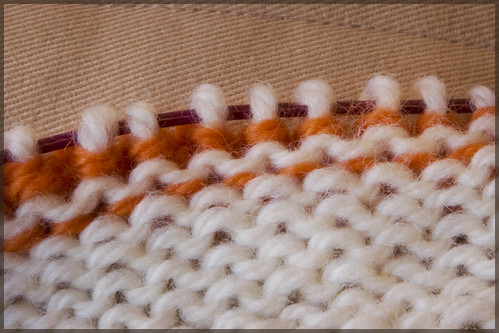
2. When ridge fabric is size desired, use a second knitting needle (one size smaller than the one you knit it with) to pick up the stitches at the start of the welt, a few rows back. You are picking up the purl bumps of the non-ridge fabric. The total number of picked up stitches should equal the number of live stitches in the welt (orange stitch count should be the same as the white stitch count).
photo (b): pick up stitches from the original fabric (not the ridge fabric)
3. Knit a row, knitting two together for each stitch: one stitch from the live row on your needle, and one stitch from the picked up stitches. Note: the picked up stitches are oriented differently than the live (orange) stitches. To orient them correctly, knit through the back loop.
photo (c): knit the welt closed - knit two stitches together.
photo (d): after the welt is closed - live stitches are once again the original yarn (white, wrong side view)
4. Knit on, you have a welt, a ridge, a pintuck in your knitted fabric!
photo (e): finished welt after knitting it closed, front of fabric
You've knit a ridge, a welt, a pintuck!


What a great way to easily add design elements.
ReplyDeleteThanks so much! This was just what I was looking for and the pictures were perfect.
ReplyDeleteWell, now I just have to try this techniques. Many thanks!
ReplyDelete