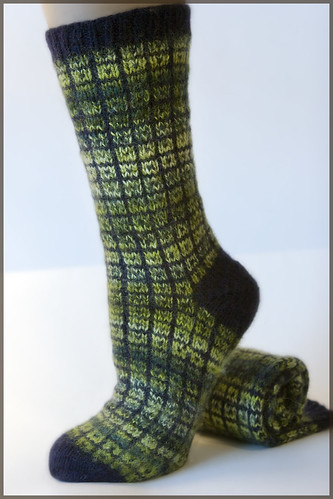
The Pattern: Lifestyle Socks
Click the photo below to see the pattern and download it. It's free.
Not a pattern, but a lifestyle
My sock making guide with a great formula for toe-up socks:
• Judy Becker's Cast On +
• Priscilla Wild's No Muss No Fuss Short Row Heel +
• And any pattern you choose +
• Any weight yarn of your choosing = Socks that always fit.
Technique
How to knit on two circular needles, brought to you by Stitch Diva
She shows you multiple ways to knit small diameter tubes.
She shows you multiple ways to knit small diameter tubes.
The Sock
Toe: Judy Becker Cast On for Toe Up Socks
Cat Bordhi demos, and unfortunately, you cannot elect for viewing in "high quality", but she uses large needles so you get the idea.
Heel: I walk you through Priscilla Wild's short row heel in my Lifestyles pattern
Updated: See a variation of this short row heel using stitch markers. You'll never lose your place between held and active stitches.
Elizabeth Zimmermann's Sewn Bind Off
You need a tail of yarn at least three times the length of the distance you need to bind off.


what a great post w/ the pattern & w/ the videos you found!
ReplyDeleteI will be bookmarking this post--thank you for gathering these resources in one place.
ReplyDeleteKathleen
Great post! I'm always in need of instructional videos and you've done the leg work for me. Sorry for the bad pun but I couldn't resist!
ReplyDeleteI am struggling with the short-row heel. I get the first part of it fine. But I struggle with the part where you re-activate the held stitches. Even when I tried this on a practice piece with large, easy-to-read yarn, I can't visually determine which two stitches have the gap. It ends up looking like lots of them do, and then I get confused, and I ended up with lots of holes and I suspect I'm not getting each held stitch systematically picked up. Is there a formula for this that doesn't depend on the visual of seeing the big gap?
ReplyDeleteHello KnitbyGrace --
ReplyDeleteYes there is, it involves using a stitch marker and moving it every time you K2 or P2 tog. Some people don't like the moving the stitch marker bit, so I have not included it. (The stitch marker ends up being held between my lips while I move things about.)
These instructions presume you have gotten to the point in the sock where you want to place a short row heel. You will be making the short row heel on 1/2 of the sock stitches. If you are knitting on two circular needles, you have placed 1/2 of the stitches on 1 circular needle, and the other 1/2 on the 2nd circular needle.
As you knit the short row heel, you will no longer be knitting in the round, but will be knitting back and forth on 1/2 of the stitches one one of the circular needles, the other 1/2 of the stitches will be ignored.
1. knit to the last stitch on the needle (you do not knit the last stitch).
your needle will look something like this - this represents a sock heel that will be knit on 36 stitches.
(0 for held, x for active):
0 [xxxxxxxxxxxxxxxxxxxxxxxxxxxxxxxxxxx] (you are knitting right to left)
2. All the x stitches are on your right needle marked by [] above.You have just knit them.Place a stitch marker in front of that last stitch - in front of the 0 on the left needle.
3. Turn the work.
4. Slip the first stitch as if to purl.
5. Purl all the stitches down to one stitch before the last one on your needle.
Your needle now looks like this - on your right needle you have (from right to left) a held stitch, a stitch marker - represented by a M below, and 34 just-knit stitches. On your left needle you have that last lone stitch, un-knit.
illustration of held (0) and active (x) stitches, [] = right needle
0 [xxxxxxxxxxxxxxxxxxxxxxxxxxxxxxxxxx M 0]
6. Place a stitch marker on the left needle, in front of the un-knit stitch.
You will now continue knit rows and purl rows, knitting or purling one stitch short of the stitch markers. In order to keep all the held stitches on the other side of the marker, you will need to move the marker over one (hence, the marker held between the lips whilst you do so.)
Reduce down to the central 12 stitches (your actual number may vary dependent on yarn size).
BEGIN ADDING IN HELD STITCHES BACK INTO THE WORK
ReplyDeleteAssuming that you have just completed knitting the 11 of the 12 center active stitches (knit side), your needle will look something like this (0 for held, x for active, M represents stitch marker)
000000000000 M x [xxxxxxxxxxx M 000000000000]
To help orient you, stitches illustrated between the [ ] brackets are on your right needle, and you have not knit the last active stitch, represented here as x on the left needle. A stitch marker sits in front of the first held stitch on the left needle (M).
You will now begin adding the held stitches back, one row at a time.
1. Move 1st stitch on the left needle to the right needle (this is the last active stitch you have not yet knit).
2. Remove the stitch marker on the left needle.
3. Slip the first stitch on the right needle back to the left needle (that last active stitch you have not yet knit.)
4. Knit 2 together.
5. Make 1 stitch (my preferred method is to go under the entire next stitch, the entire "v", not just one side or leg of it, and pull up a new stitch.) Pull that new stitch pretty tight.
6. Place the stitch marker on the left needle.
7. Turn your work.
8. Slip the first stitch (this is the M1 stitch you just created.)
9. Purl(or knit,as appropriate)one stitch short of the stitch marker.
Repeat 1-9 until all stitches are back in work on this needle.
CONTINUE THE SOCK - KNITTING IN THE ROUND TO CREATE THE LEG
Continue knitting to the 2nd circular needle, knitting in your chosen pattern until the sock leg is the length you desire.
As you can see, this is a pretty wordy description, but if you do this, it is absolutely failproof. You won't forget which is your "active" and which is your "held" stitches.
Happy socking!
Charisa
Charisa: Thank you so much for your explanation; it took alot of time to write all that out! I just found your reply, and will need to print it off to study it more carefully.... thank you much. I'll let you know how it goes!
ReplyDeleteIt looks very easy to make. I just wish that I can make it perfect. Thank you for sharing those videos. It is very helpful and with that it makes the making of those socks easy.
ReplyDeleteNo matter what I do I end up with enormous gaping holes from where I begin this short row heel.
ReplyDeleteI really want to be able to do this. Also, the heel doesn't seem deep enough, as I'm knitting 'dorm socks' on 28 or 32 st with thick yarn.
What's going wrong? TT__TT
-Sailor Kenshin, socknitters
Sailor -- if you are making a heel on 14 (1/2 of your 28)stitches, even if it is on bulky yarn, it is not likely to be deep enough. I haven't knit bulky dorm socks so I can't help you with that instruction.
ReplyDeleteHowever, if you are getting holes, it is probably due to the method that you pick up and add in your extra stitch. Make sure you twist the stitch - that closes the gap. You might also need to go down a needle size or two. Socks, even 'dorm socks' should be knit fairly tightly and make a firm fabric.
I can't possibly thank you enough for this method and videos! Until now, I've had seriously large holes in my heels.. no more! between this, the magic cast on, and the magic loop .. i'm totally addicted to sock knitting! I typically have 4 or 5 pairs in progress at any given time! thank you so very much!!
ReplyDeleteCharisa I am making the putting me on socks with the majic loop and one circular needle. I am stumped @ heel extension & heel flap. Do I do the heel flap on the lessor amount of stitches (they were my needle 2 but now the heel extension is on needle 2). This is my first try @ socks so any help you can give would be greatly appreciated. MEH
ReplyDeleteMEH - I would recommend you check with Ravelry to download a sock pattern with a heel extension to help guide you through it. I have one available here if you want to use this one:
ReplyDeletehttp://www.k1p1design1.com/YourePuttingMeOnSocksFormula_2Circul.pdf?attredirects=0
the link doesn't seem to work
ReplyDelete??????http://www.k1p1design1.com/YourePuttingMeOnSocksFormula_2Circul.pdf
Hello All, I am no longer updating this blog and as a result, some links may have changed. See my updated Website (links to all my patterns are there) as well as my new blog: http://www.k1p1design1.com
ReplyDelete