Don't be daunted by the long-winded instructions - skip right to the videos. It's easier to see how to do it than to explain how to do it!
Knit the “short rows”
1. On needle 1 knit to one stitch before the last stitch on the needle (you do not knit the last stitch).
2. Place a stitch marker in front of that last stitch on Needle 1.
3. Turn the work.
4. Slip the first stitch as if to purl.
5. Purl all the stitches down to one stitch before the last stitch on your needle. (you do not knit the last stitch).
6. Place a stitch marker on the left needle, in front of the un-knit stitch.
7. Turn the work.
You will now continue knit rows and purl rows over the stitches on Needle 1, knitting or purling one stitch short of the stitch markers. Move the un-knit stitch in front of the marker to the right needle, remove the marker, move the un-knit stitch you just place on the right needle to the left needle. Place the stitch marker on the left needle. Turn the work, while making the short rows, always slip the first stitch as if to purl. Continue until you have reduced down to 12 “active” stitches and have just finished a purl row.
Video illustrating knitting the short rows:
Add held stitches back into the work.
Turn the work, slip the first stitch, and knit 11 of the 12 center active stitches, your needle will look like this:
Left needle Right needle
[000000000000000 M X] [XXXXXXXXXXX M 000000000000000]
0 = held stitch; M = stitch Marker, X = active stitches
To help orient you, on the right needle you have held stitches, a stitch marker, and 11 active stitches. On the left needle you have the un-knit last active stitch, represented here as X on the left needle. A stitch marker (M) sits in front of the held stitches. Dependent on size of yarn and your foot, the number of held stitches will vary.
You will now begin adding the held stitches back, one row at a time, continuing to knit back and forth.
1. Move 1st stitch on the left needle to the right needle (this is the last active stitch you have not yet knit).
2. Remove the stitch marker on the left needle.
3. Slip the first stitch on the right needle back to the left needle (that last active stitch you have not yet knit.)
4. Knit 2 together.
5. Make 1 stitch (go under the entire next stitch, not just one side or leg of it, and pull up a new stitch.) Pull that new stitch pretty tight.
6. Place the stitch marker on the left needle.
7. Turn your work.
8. Slip the first stitch (this is the M1 stitch you just created.)
9. Purl (or knit, as appropriate) one stitch short of the stitch marker.
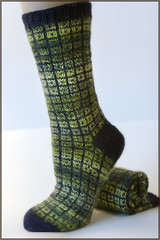
For a colorwork sock (assumption is that you are doing colorwork on the foot and the sock leg, the heel and toe are knit in one color) – you will repeat steps 1-9 until 2 stitches are still held on each side of the marker and you have just completed a purl row. Turn, knit to marker, remove marker, and knit the remaining 2 stitches on the needle. If you are knitting in one color, you will add in all the held stitches.
Video illustrating adding the held stitches back into work:
Also, here are a few videos to help with colorwork management:
How to knit with two colors using two hands:
How to catch or weave in the yarn when it must be stranded over several stitches:


Thanks so much, I really like how clean this method is:)
ReplyDeleteThank you for the amazing videos you've made. I am a new knitter and have attempted socks. Thanks to the short heel method on your video I did pretty well on my first attempt.
ReplyDeleteI REALLY like the way you knit especially holding your yarn. You make it look sooo easy and effortless. My fingers are flying all over the place. I would love to see an up-close slow motion version of how you hold the yarn, move your hands for both knit and purl. Do these videos exist?
Lori, I'm sorry that I am so behind on approving comments -- just saw your question. I do have a video that shows how I knit and purl, it's here: http://www.youtube.com/watch?v=-0zsLKHO568
ReplyDeleteFYI: My method of purling is not as efficient as I've seen.
Thank you for the videos! I have recently started knitting socks and am experimenting with different types of heels. I have the gusset nailed but would LOVE to find a great short row heel. I knit two heels (just the heel, not the entire sock) using your method over the weekend. I still end up with big holes. I think it has to do with where I'm picking up stitches after the knit together. I think I figured it out on the purl side (which looks beautiful), but the knit side is a bit of a disaster. I'll keep on trying...
ReplyDeleteFor clarification... do you knit 2 together on both the knit AND the purl side? Or do you knit 2 together on the knit side and purl 2 together on the purl side?
ReplyDeleteI use the KFB method of increasing. Would I make a stitch in the next stitch after k2tog or in the same stitch by putting it back on the left needle and making a stitch in that stitch? I hope that makes sense. If that type of increase is not feasible in this pattern, I'll try to pick up the stitch below and knitting it. Thanks!
ReplyDelete