My first warp board idea was discussed in this post. My knit buddy Kristin, came up with a really easy, cheap warp device that requires PVC pipe, (plus connectors and elbows), only one tool (a hand held PVC pipe cutter - purchased in the same section as the PVC pipe) -- all readily available at your local Home Improvement center, in the plumbing section. The cost for the equipment was around $20.
See it here:

As you see, the number of stripes you want to create is up to you and your imagination. How many wraps per station, the sequence that you wind the stations (sequential stripes ? back and forth then back again? etc.) I cut the long sections 18" so that one full wrap of yarn around it equal 1 yard.
Wind the undyed yarn [x] times around one station of PVC pegs - [x] being the number you choose, then move on to the next station. The number of times you wind will impact the size of the stripe. I wrapped 10 times around each station, sequentially (station 1, station 2, station 3, and so on)
Here is a quick and dirty schematic for the wrapping sequence:
(click for bigger, easier to read image)

.
Notice the little yarn lengths on every station?

Using a piece of colored yarn about 18" as a marker - fold it over each completed set of [x] wraps. It helps answer the question -- how many wraps have I done? Especially important if you have designed a consistent stripe pattern.
After wrapping the warp device with your skein of yarn, loosely tie each circle of yarn. Tie the areas where the yarns criss-cross too. Make your ties loose unless you want an Ikat-like feature in your yarn. Lift the tied circles of yarn off your device. Don't handle roughly or you'll have a tangled mess. Prepare the wool for dyeing (usually, just a soak in water is required.)
My yarn volume was low enough to place each circle in a jar of pre-mixed dye (with vinegar added). All the jars were set in a water bath and heated until the dye had exhausted and the water was nearly clear. (This is standard for Jacquard dyes/acid dyes on protein fiber, like wool.)

Process (wash, rinse) the dyed wool as you normally do (don't felt it, keep the temp even to avoid shocking wool). Hasten drying by placing the wool hanks in a towel, roll it up and stomp on it. Unroll and lay out to dry.
When the yarn is dry, go back to your Warp device. Cut 6 more long PVC sections for each wrapping station. This time, cut each section two inches shorter than your original length (in my example the original long sections were 18", so cut the new sections, 16", cut 6 of them.). Swap out the original long PVC sections for the new shorter ones. Why? You are going to wind the dyed yarn off from the device, and yarn shrinks during the dyeing process.
Place each circle of dyed yarn on a wrap station. Be careful to ensure that you are putting the yarn back on in the sequence it was wound on. (Because oh woe to you if you don't.)

Wind the yarn off onto your favorite niddy noddy. (When I made the PVC warp device, I used some extra PVC to make a niddy noddy.) This part of the process can be the most tedious if you place the yarn hanks back on the device, but upside down. You may end up threading the niddy noddy through the yarn sections as you wind it off. Be patient, it's worth it!
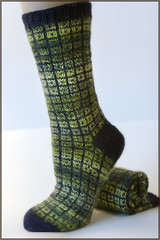
Here's the finished product!

About 500 yards of near lace-weight self striping beautiful!
A quick note about my colors. I selected three colors: yellow, green, and teal. Then I mixed the "in between" colors with a portion of each of the three selected colors. The color sequence was: YELLOW, yellow-green, GREEN, teal-green, TEAL, teal-yellow. (Color names in all caps were not combined with another color.) When I finished the dye job, the yellow was waaaay too bright and would have stuck out like a sore thumb. So, after the wool was dry, I took only the yellow hank and dyed it with green to bring the color down to a near matching value with the rest of the stripes.


I'm speechless. I've been trying to figure out a space-efficient way to try dying my own yarn - this is FANTASTIC!! We have a smaller house and my husband cannot stand mess so this is just too great - thank you so much!!
ReplyDeleteThanks! However, after doing stripes this way, I decided this is a LOT of work to make stripes and simply avoid weaving in ends...Here is a shawl I made with this yarn:http://pulsh.blogspot.com/2010_04_01_archive.html
ReplyDeleteOMG this is amazing!! Thanks so much for sharing this!
ReplyDeleteThis is a really brilliant idea! I've been wrestling with trying to find solutions myself, from knitting up blanks to paint directly to a weird diagram involving a bike wheel and the length of the front yard -- this is actually something workable for those of us who have small houses with no long hallways for dip dyeing, and that is fantastic.
ReplyDelete