26 July 2009

Party, party, party, indeed.

The whole month ended up being a birthday celebration. On Thursday, the actual bday, my kids made a meal for a queen.

Yesterday we capped the long celebration with a knit/spin/eat/drink party that lasted the day
and most of the night. We just did not want it to end. And laugh we did! Below I'm catching Tuulia modeling one of her amazing top-down set in sleeve sweaters (link to the pattern, you need it!) as she is saying something naughty, and I'm getting her good. The whole day was like that.

Tuulia makes a faceI pull one over on Tuulia - image of her laughing out loud


My sweetheart, Carol, had a special bracelet made for me - made with antique typewriter keys.
It is so cool! She knows me, don't you think?
photo of bracelet with typewriter keys

You too can have one from TAB Typewriter Key Jewelry.

Just see what a wealth of talent we have in this area. Doesn't it make you want to knit, spin, or dye fiber? This was the fiber loot I got from my fiber buddies yesterday:


A colorway just for me by Kristin, of Allspunup:
image of yarn dyed by allspunup.etsy.com


Handspun yarn by TheKnittingMama, roving dyed by Allspunup:
beautiful rainbow colored handspun yarn photo


Then, Tuulia overwhelmed me with a ton of her beautiful handdyed roving. Oh my.
image of beautiful handdyed roving for spinning


A photo of all the loot together. The unlabeled stuff on the left edge is roving and yarn I dyed myself (yesterday morning.)
photo of all the fiber goodness received yesterday


Many thanks to all my friends and family who made the month a wonderful celebration. Special thanks to Barb for the candles and cinnamon/lavender soap and to Linda for the amazing
mini sock blocker key chain!

05 July 2009

It's my birthday and I'll party if I want to.

Well, not exactly my birthday yet, but close enough. I figure turning 50, I
get to celebrate as long as I want. So, you may ask, what did I do? I bought a miracle machine.

Start with a mixture of handdyed alpaca roving and mohair locks. (Can you believe how vibrant the mohair locks are? They take dye so beautifully. All those locks were in the same dye bath.)
Image of Mohair and alpaca before carding

Feed into one miracle machine (aka, Strauch finest drum carder, newly arrived at my doorstep on Thursday.)
Image of mohair entering drum carder

Out comes a basket of beautiful fluffy stuff to spin.
Image of basket with fluffy carded mohair and alpaca blend

Image of mohair and alpaca fiber on spinning bobbin

04 July 2009

Too hot to knit - Lemon Bars!

It is the most beautiful day of the year. We are celebrating with Lemon Bars.


Lemon Bar Recipe:
Pastry Crust:
1 cup butter
1 3/4 cup flour
Pinch of salt
2/3 cup confectioner's sugar (plus you'll need a little more for the topper.)

Lemon Custard:
2 1/4 cups plain sugar
1/3 cup flour
6 eggs, slightly beaten
Pinch of salt
3/4 cup lemon juice (about 4 large lemons)
Zest from those 4 lemons

Directions below:
If eggs are straight out of the fridge, submerge in warm water to bring them to room temperature.
Image Eggs warming in water
Mix pastry crust ingredients until crumbly.
Image pastry crust
Pat into 9x13 pan that has been buttered and floured. (I made a double batch, do not sneak it up the sides like I did.)
Image of pans filled with pastry crust
Cook the pastry crust for 20 minutes at 350 degrees, and while you wait, remove the zest from 2-3 lemons.
Image Lemons being zested
Then, squeeze the lemons to get the juice for your bars.
Image of squeezed lemons
Mix the lemon juice, lemon zest, sugar, eggs, pinch of salt and flour well (this is the custard topping).
Image Lemon Custard
Pour the custard topping mix into the cooked pastry. (See the bottle of lemon juice in the photo, you might have to augment your fresh lemon juice, so, good to have on hand.)
Image cooked pastry awaiting custard
Bake the custard about 20 min at 300 degrees (custard should stand up but not be terribly hard, just slightly firm). Let cool. Cut into bars, sprinkle with confectioner's sugar. Serve cold.
Image of finished lemon bars

Cookie A. comes to town

Last week Cookie A. of Monkey Sock fame* was in town and I caught a class on designing socks at the Village Yarn & Tea shop. Man, that girl is technical. It was such a pleasure to hear how she engineers a sock. Imagine what she could do for world peace. Maybe she already is!

Her new book, Sock Innovation (now on sale at Knitpicks), is great if you want to design socks. She is a big advocate of top-down and has some great arguments for the top-down method - you will still have to swatch. You know I'm the opposite, a big fan of toe up, but I'm willing to try her method. It's brilliant if you want to design every detail.

Some shots of Cookie:

Image Cookie A, 28 June 2009


Image of Cookie A., knitwear designer


Image of Cookie A., knitwear designer


I am still working on my Worryfree Cardi (nearly done!) So, I'll be gearing up to knit some freshly-designed socks. To prep: hand dyed this sock yarn. It is blue and light blue and should self stripe.

Image blue and light blue yarn


And, recently off the wheel, some blue/brown 30% Angora/70% Merino roving from Allspunup. I handspun the fiber and created a 2-ply. Next to the handspun (left) is purchased 50/50 Angora/Merino 2 ply yarn that I dyed to work with the handspun. I'm thinking a lacy scarf? I have about 600 yards between the two skeins.

Image of handspun and handdyed yarn

*Look at all these monkey socks on flickr!

01 July 2009

No Muss No Fuss Short Row Heel – Variation with Stitch Markers

I’ve had lots of requests from folks that like the short row heel in the 
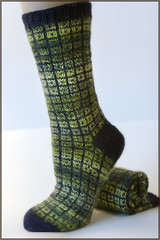
Lifestyle Socks pattern – but they often get lost between the “held” stitches and the “active” stitches. Here are a few tutorials using the same short row method with stitch markers to help hold your place. The instructions and videos below are for knitting a heel in a stranded colorwork sock. The heel is knit in one color of yarn. Assumption is that you are knitting in the round on two circular needles. The heel is knit on only one of the circular needles, and the other half of the sock stitches sit on the other needle, ignored while you create the sock heel.

Don't be daunted by the long-winded instructions - skip right to the videos. It's easier to see how to do it than to explain how to do it!

Knit the “short rows”
1. On needle 1 knit to one stitch before the last stitch on the needle (you do not knit the last stitch).
2. Place a stitch marker in front of that last stitch on Needle 1.
3. Turn the work.
4. Slip the first stitch as if to purl.
5. Purl all the stitches down to one stitch before the last stitch on your needle. (you do not knit the last stitch).
6. Place a stitch marker on the left needle, in front of the un-knit stitch.
7. Turn the work.
You will now continue knit rows and purl rows over the stitches on Needle 1, knitting or purling one stitch short of the stitch markers. Move the un-knit stitch in front of the marker to the right needle, remove the marker, move the un-knit stitch you just place on the right needle to the left needle. Place the stitch marker on the left needle. Turn the work, while making the short rows, always slip the first stitch as if to purl. Continue until you have reduced down to 12 “active” stitches and have just finished a purl row.

Video illustrating knitting the short rows:

Add held stitches back into the work.

Turn the work, slip the first stitch, and knit 11 of the 12 center active stitches, your needle will look like this:

        Left needle                                Right needle
[000000000000000 M X] [XXXXXXXXXXX M 000000000000000]
0 = held stitch; M = stitch Marker, X = active stitches
To help orient you, on the right needle you have held stitches, a stitch marker, and 11 active stitches. On the left needle you have the un-knit last active stitch, represented here as X on the left needle. A stitch marker (M) sits in front of the held stitches. Dependent on size of yarn and your foot, the number of held stitches will vary.

You will now begin adding the held stitches back, one row at a time, continuing to knit back and forth.
1. Move 1st stitch on the left needle to the right needle (this is the last active stitch you have not yet knit).
2. Remove the stitch marker on the left needle.
3. Slip the first stitch on the right needle back to the left needle (that last active stitch you have not yet knit.)
4. Knit 2 together.
5. Make 1 stitch (go under the entire next stitch, not just one side or leg of it, and pull up a new stitch.) Pull that new stitch pretty tight.
6. Place the stitch marker on the left needle.
7. Turn your work.
8. Slip the first stitch (this is the M1 stitch you just created.)
9. Purl (or knit, as appropriate) one stitch short of the stitch marker.
For a colorwork sock (assumption is that you are doing colorwork on the foot and the sock leg, the heel and toe are knit in one color) – you will repeat steps 1-9 until 2 stitches are still held on each side of the marker and you have just completed a purl row. Turn, knit to marker, remove marker, and knit the remaining 2 stitches on the needle. If you are knitting in one color, you will add in  all the held stitches.

Video illustrating adding the held stitches back into work:

Also, here are a few videos to help with colorwork management:
How to knit with two colors using two hands:

How to catch or weave in the yarn when it must be stranded over several stitches:

About Me

My photo
I'm Charisa on Ravelry.

Follow PULSH on Facebook

P U L S H © 2008. Template by Dicas Blogger.

TOPO